Introduction – Why HDHMR Requires Proper Handling
High-Density High Moisture-Resistant (HDHMR) board has become a go-to material for modern furniture, cabinetry, and interior panelling, prized for its durability, moisture resistance, and smooth finish. However, treating it like traditional plywood or even standard MDF is a common mistake that can lead to chipped edges, poor finishes, and failed joints.
HDHMR is an engineered wood product, created by combining hardwood particle fibers with a special resin binder and compressing them under immense pressure and heat. This process results in an incredibly dense and uniform panel, free of the knots and voids found in natural wood. While this density is its greatest strength, it also presents unique challenges during fabrication.
Unlike plywood, which has layered grains that can splinter, HDHMR has a homogenous core that can dull tools quickly and requires specific techniques to achieve clean, professional results. Understanding how to work with its properties—not against them—is the key to unlocking its full potential. This comprehensive guide is designed for carpenters, interior professionals, and ambitious DIYers, providing the hands-on, practical tips needed to master working with HDHMR from the first cut to the final installation.
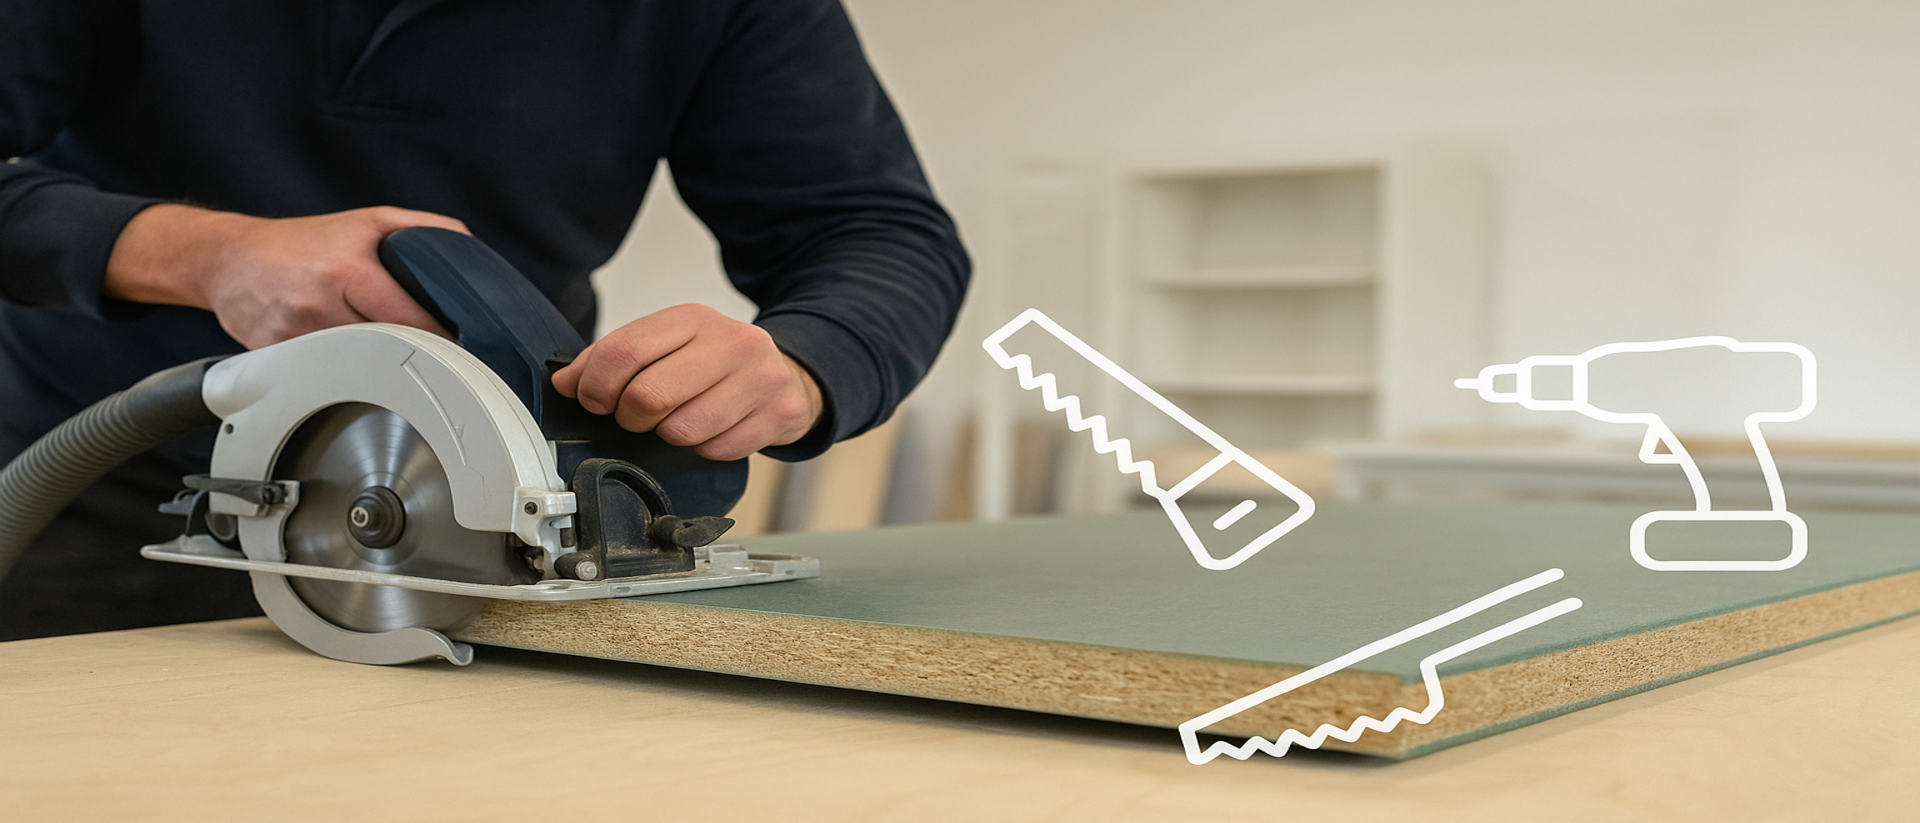
Tools & Blades for Cutting HDHMR
The secret to a flawless finish on any HDHMR project begins with the cut. Due to its high density and the resins used in its composition, using the wrong tools or blades will result in chipping, burning, and rapid tool wear. Investing in the right equipment isn't just a recommendation; it's essential for efficiency and quality.
Carbide-Tipped Saw Blades (for clean cuts)
Standard steel blades will not last long against the abrasive nature of HDHMR. The heat and friction generated during cutting will dull them almost immediately. The non-negotiable choice for cutting HDHMR is a high-quality, carbide-tipped blade.
-
Blade Type: Look for blades specifically designed for cutting laminate, melamine, or MDF. These are engineered to handle dense, composite materials.
-
Tooth Count (TPI): The higher the tooth count, the cleaner the cut. For a 10-inch (254 mm) circular or table saw, aim for a blade with 60 to 80 teeth. A lower tooth count (like a 24-tooth framing blade) will be too aggressive and will cause severe chipping and tear-out.
-
Tooth Geometry: The shape of the carbide teeth plays a crucial role.
-
Alternate Top Bevel (ATB): This is a common and effective geometry where teeth alternate between a left- and right-hand bevel, acting like sharp knives to score the material before removing it.
-
Triple-Chip Grind (TCG): This is a premium choice. It combines a flat "raker" tooth with a higher, beveled "trapeze" tooth. The TCG design is exceptionally durable and produces extremely clean, chip-free cuts in dense materials like HDHMR, making it ideal for professional cabinet makers.
-
Pro Tip: Keep your blades clean. Resin from the HDHMR board can build up on the teeth, increasing friction and heat, which leads to burning and a poor-quality cut. Clean your blades regularly with a specialized blade cleaner and a brass brush.
CNC and Router Use on HDHMR
HDHMR is an excellent substrate for CNC machining and routing due to its uniform density and lack of grain. It allows for intricate designs, grooves, and profiles without the risk of splintering associated with solid wood.
-
Router Bits: Use solid carbide or carbide-tipped router bits. For cutting shapes or dados, spiral up-cut or down-cut bits are superior to straight bits.
-
Up-cut Spiral Bit: Pulls chips up and out of the cut. Excellent for clearing material but can cause minor fuzzing or chipping on the top surface.
-
Down-cut Spiral Bit: Pushes chips down into the cut. This leaves a pristine, clean top edge, making it perfect for visible grooves and dados.
-
Compression Bit: Combines both up-cut and down-cut flutes. It's the ultimate choice for cutting through a full sheet, as it leaves a perfectly clean edge on both the top and bottom surfaces.
-
-
CNC Machining: When using a CNC router, feed rates and spindle speeds must be optimized. Moving too slowly or with too low of a spindle speed can cause the resin to burn. It's often better to make two shallower passes at a higher feed rate than one deep, slow pass.
Safety Gear and Precautions (HDHMR dust, etc.)
Working with HDHMR is safe, but proper precautions are mandatory. The dust produced is not like regular sawdust; it's a fine powder containing wood fibers and resin particles. Always use the following personal protective equipment (PPE):
-
Respiratory Protection: This is the most critical safety measure. The fine dust can be a significant respiratory irritant. Always wear a well-fitting N95 or P100 dust mask or respirator. A simple cloth mask is not sufficient.
-
Eye Protection: Safety glasses are essential to protect your eyes from flying dust and chips, especially when using routers or saws.
-
Hearing Protection: Power tools, particularly saws and routers operating at high speeds, generate significant noise. Use earplugs or over-ear defenders to protect your hearing.
-
Dust Collection: An active dust collection system connected directly to your tools is highly recommended. A shop vacuum with a fine dust filter can capture the majority of the particles at the source, keeping your workspace cleaner and the air safer.
How to Cut HDHMR Board Smoothly
Even with the best blade, your technique determines the quality of the cut. HDHMR's smooth, pre-laminated or raw surface is unforgiving of poor technique, and any chip is immediately noticeable.
Scoring and Cutting Technique (to prevent chipping)
The key to a chip-free cut is to prevent the saw blade's teeth from aggressively grabbing and tearing the surface fibers.
Step-by-Step Guide for a Perfect Cut:
-
Mark Your Line: Use a sharp pencil or marking knife for a precise line.
-
Apply Painter's Tape: Place a strip of high-quality painter's tape along the cut line. This simple step provides support to the surface fibers and dramatically reduces chipping.
-
Score the Line: Using a sharp utility knife and a straight edge, carefully score the cut line through the tape and into the surface of the HDHMR board. This creates a predefined "break point" for the fibers.
-
Set Blade Depth: Adjust the depth of your circular saw or table saw blade so that the carbide tips extend just about 1/4 inch (6 mm) above the material's surface. A blade that is set too high has a more aggressive cutting angle and increases the likelihood of chipping.
-
Perform the Cut: Guide the saw smoothly and steadily through the material. Do not force the tool; let the blade do the work. A consistent feed rate prevents burning and ensures a clean cut.
Direction Matters:
-
Circular Saw: The blade cuts in an upward motion. Therefore, place the "good" face of the board facing down to ensure the cleanest edge is on the visible side.
-
Table Saw: The blade cuts in a downward motion. Place the "good" face of the board facing up.
Supporting the Board (to avoid splintering)
HDHMR is rigid but can still vibrate or sag during cutting, leading to splintering on the exit side of the cut (tear-out).
-
Zero-Clearance Insert: On a table saw, use a zero-clearance insert. This is a plate that sits flush with the saw table, with a slot that is the exact width of the saw blade. It provides complete support to the bottom of the board right up to the blade, eliminating tear-out.
-
Sacrificial Board: When using a circular saw or jigsaw, place a sacrificial sheet of foam insulation or scrap MDF underneath the HDHMR board. This supports the fibers on the underside as the blade exits, resulting in a much cleaner cut.
-
Outfeed Support: For large sheets, always use an outfeed table or rollers to support the board after it passes the blade. Letting a large offcut drop can cause the board to pinch the blade or splinter at the end of the cut.
Cutting Large Sheets vs Small Pieces
The tool and approach change based on the size of the workpiece.
Edge Finishing and Surface Treatment
The factory surface of HDHMR is smooth and non-porous, but the moment you cut it, you expose the porous, fiber-based core. Properly finishing these edges is crucial for both aesthetics and long-term durability, especially against moisture.
Edge Banding HDHMR (materials and process)
For cabinetry and furniture, edge banding is the most professional way to finish cut edges. It provides a clean, durable, and decorative finish that matches the board's surface.
Common Edge Banding Materials:
-
PVC (Polyvinyl Chloride): Extremely durable, waterproof, and available in a vast range of colours and textures. It's the most common choice for commercial and kitchen applications.
-
Veneer: A thin slice of real wood. It can be stained or finished to match other wooden elements in a project, offering a more natural look. It is less resistant to impact and moisture than PVC.
The Edge Banding Process (Iron-On Method):
-
Ensure a Clean Edge: The cut edge of the HDHMR must be perfectly smooth and square. Sand it lightly with 220-grit sandpaper to remove any saw marks.
-
Cut the Banding: Cut a piece of edge banding about an inch longer than the edge you are covering.
-
Apply Heat: Use a dedicated edge banding iron or a regular household iron on a medium-high (cotton) setting with no steam. Place the banding on the edge and slowly run the hot iron over it to melt the pre-applied hot-melt adhesive.
-
Apply Pressure: Follow the iron with a small block of wood, pressing down firmly to ensure a strong bond.
-
Trim the Excess: Once cooled, use a specialized edge banding trimmer or a very sharp chisel held flat against the board's surface to trim the overhanging edges.
-
Finish: Lightly sand the corners with a fine-grit sanding block to slightly ease the sharp edge.
Sanding and Smoothing Edges
If you plan to paint the edges instead of banding them, proper preparation is key to avoiding a fuzzy, porous look.
-
Initial Sanding: Sand the cut edge with 150-grit sandpaper to remove any roughness.
-
Apply a Sealer: The raw edge will soak up paint like a sponge. To prevent this, apply a thin coat of wood filler, sanding sealer, or even a thick primer.
-
Final Sanding: Once the sealer is dry, sand it smooth with 220-grit sandpaper. The edge should now feel as smooth as the face of the board. It is now ready for priming and painting.
Preparing HDHMR for Paint or Laminate (surface sanding, priming)
The factory surface of HDHMR is very smooth, which can sometimes pose a challenge for paint adhesion. To prepare it properly:
-
Surface Preparation: Lightly scuff the entire surface with 220-grit sandpaper or a fine sanding sponge. You are not trying to remove material, only to dull the sheen and create a microscopic texture for the primer to grip.
-
Cleaning: Wipe the surface thoroughly with a tack cloth or a cloth dampened with mineral spirits to remove all dust.
-
Priming is a Must: Never apply paint directly to HDHMR. Use a high-quality primer designed for glossy or difficult surfaces. Solvent-based or shellac-based primers are generally superior for sealing the material and ensuring excellent adhesion.
-
Applying Laminate: If you're applying a decorative laminate sheet (like Formica or Sunmica), the surface should be clean and dust-free. Use a high-quality contact cement, applying it evenly to both the HDHMR substrate and the back of the laminate sheet as per the manufacturer's instructions.
For a complete walkthrough on painting this material, check out our detailed guide on how an HDHMR board can be painted step-by-step.
Fastening & Joining HDHMR
HDHMR's dense core provides excellent holding power for fasteners, but only if the correct techniques are used. Its hardness means it is prone to splitting if you simply drive a screw into it without preparation.
Best Screws and Drill Techniques (preventing splits)
Follow these rules for strong, split-free joints:
-
Pilot Holes are Mandatory: Always drill a pilot hole before driving a screw. The pilot hole should be slightly smaller than the screw's shank diameter. This removes material and gives the screw threads a path.
-
Countersinking: For a flush finish, use a countersink bit after drilling the pilot hole to create a recess for the screw head.
-
Choose the Right Screws: Standard wood screws can work, but specialized screws for MDF and particleboard are far better. These screws have a coarser thread for better grip in engineered wood.
-
Avoid the Edges: Do not place screws too close to the edge or corner of a board. A general rule of thumb is to maintain a distance of at least 2 inches (50 mm) from a corner and 3/4 inch (19 mm) from an edge.
Using Adhesives and Dowels (when applicable)
For the strongest possible joints, combine mechanical fasteners with adhesives.
-
Adhesives: Standard PVA wood glue (like Fevicol SH in the Indian context) works very well with HDHMR, especially on the raw, cut edges. Apply a thin, even layer to both surfaces before clamping. For applications requiring higher moisture resistance, a polyurethane adhesive is an excellent choice.
-
Dowels and Biscuits: To add significant mechanical strength and ensure perfect alignment during glue-ups, consider using dowels or biscuits. These methods are particularly useful for constructing cabinet carcasses and shelving units.
Hinge and Hardware Installation Tips (for HDHMR cabinets/doors)
HDHMR is a fantastic material for cabinet doors and carcasses due to its stability. When installing hardware, particularly European-style concealed hinges, precision is key.
-
Use a Hinge-Boring Jig: These hinges require a large-diameter, shallow hole (typically 35 mm). A Forstner bit used in a drill press is ideal for this. For on-site work, a specialized hinge-boring jig will ensure the hole is drilled to the perfect depth and location.
-
Screws for Hinges: The small screws supplied with hinges require very precise pilot holes. Use a self-centring drill bit (Vix bit) to ensure the pilot hole is perfectly centred in the hinge plate's screw hole. This is especially important as HDHMR does not "give" like solid wood.
Given its stability and smooth surface, many professionals question if HDHMR board is good for kitchen cabinets, and the answer is a resounding yes, provided these installation techniques are followed.
Installation Best Practices
Proper installation ensures your HDHMR project not only looks good but also performs well for years to come.
Handling Weight and Support
HDHMR is significantly denser and heavier than plywood or MDF of the same thickness.
-
Plan Your Lifts: Always have help when moving full sheets.
-
Provide Adequate Support: When used for long shelves, HDHMR can sag under its own weight over time. Ensure shelves longer than 24 inches (600 mm) have central support or are reinforced with a wooden edge cleat.
-
Secure Fixings: When mounting HDHMR cabinets or panels to a wall, ensure you are anchoring them into solid studs or using appropriate heavy-duty wall anchors. Do not rely on drywall alone.
Allowing for Expansion Gaps or Treatments
While HDHMR is highly stable and moisture-resistant, it is still a wood-based product and can experience minimal expansion and contraction with significant changes in humidity.
-
Seal All Edges: As discussed, any cut edge is a potential entry point for moisture. Even if an edge is not visible (e.g., the back of a cabinet against a wall), it's good practice to seal it with a coat of primer or paint. This is crucial for understanding its performance, as detailed in our analysis of whether HDHMR is waterproof, termite-proof, or fire-resistant.
-
Acclimatize the Board: If possible, let the HDHMR boards sit in the room where they will be installed for 48 hours. This allows them to acclimatize to the ambient temperature and humidity, reducing the chance of movement after installation.
On-Site Cutting vs Factory Cuts (pros/cons)
Common Mistakes to Avoid (and Troubleshooting)
Even experienced woodworkers can run into issues when first working with HDHMR. Here’s a quick troubleshooting guide:
Conclusion – Mastering HDHMR for Professional Results
Working with HDHMR board isn't difficult, but it is different. It demands a level of precision, the right tools, and an understanding of its unique engineered properties. By trading the brute force that might work with other materials for a more methodical and prepared approach, you can achieve results that are clean, durable, and highly professional.
The key takeaways are simple:
-
Invest in a high-quality, high-TPI carbide-tipped blade.
-
Always support your workpiece and use techniques like scoring to prevent chipping.
-
Prepare and seal every cut edge to protect against moisture.
-
Never drive a screw without first drilling a properly sized pilot hole.
By following these fundamental principles, you can confidently use HDHMR to build beautiful, long-lasting furniture and interiors that truly stand the test of time.
Disclaimer: This article is generated using AI-assisted research and is intended for informational purposes only. While we strive for accuracy, readers are advised to verify all technical, pricing, and brand-specific details with official sources. hdhmr.in is not liable for any decisions made based on this content.